To purchase a PDF, add free version of this pattern, you can do that via THIS LINK at a very low price.
For this project, I decided to use Lily Sugar 'N Cream 100% Cotton Yarn in Coral Rose and Overcast. I chose this yarn because it's an affordable sturdy cotton yarn that you can throw in the wash over and over again. If you wish, you can substitute any other worsted weight cotton yarn you prefer
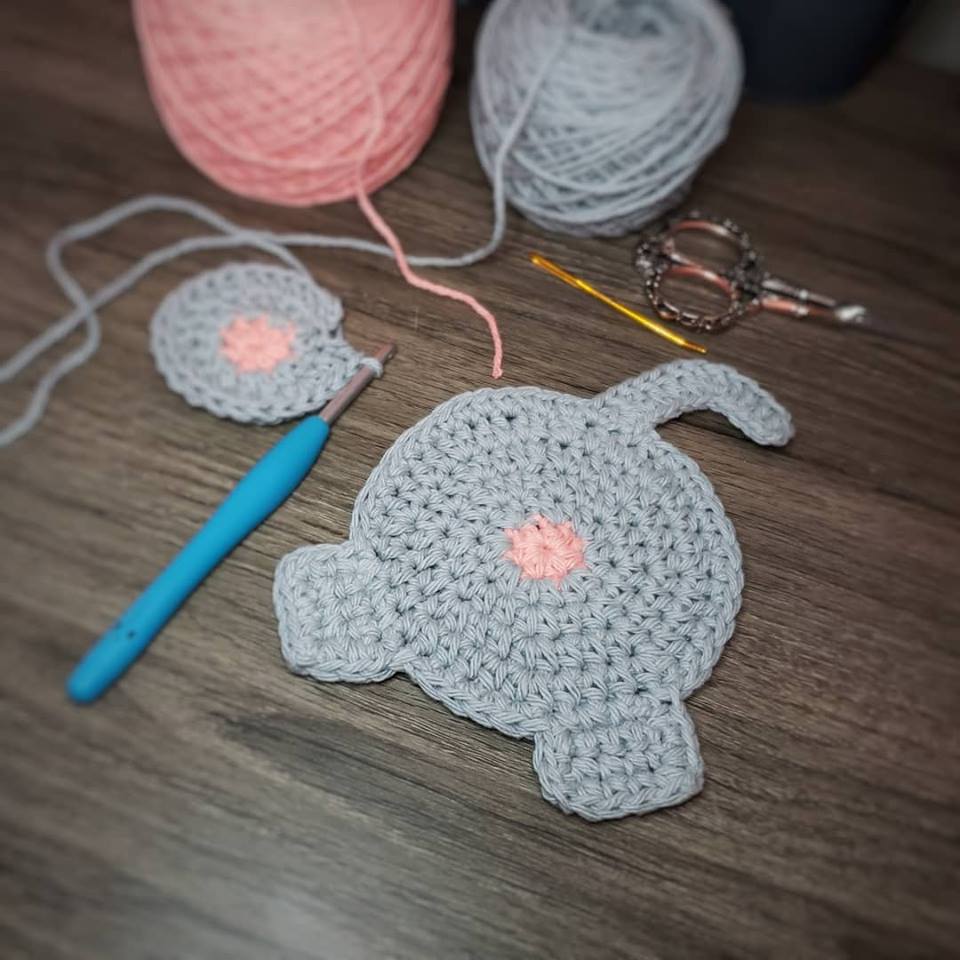
This a great project for those left over balls of yarn that aren't quite big enough to make much of anything with. You can mix and match all sort of colors to create a unique look and even replicate your own cat's butt!
These are also great if you upcoming craft shows and fairs.
Please note that this blog and post contains affiliate links and any sales made through such links will reward me a small commission – at no extra cost for you. You can view the disclosure for more information by following this link.
What You'll Need:
- 4.5mm Crochet Hook
- Lily Sugar 'N Cream 100% Cotton Yarn in two colors
- Scissors
- 6 Stitch Markers
- Darning Needle (if you dont have a bent tip needle, I can't recommend them enough! They're a game changer. Click the link to get your own! )
Pattern Notes:
Pattern is worked in the round (we will not be turning until specified), with a slip stitch (sl st) to join at the end of reach row
Chain (ch) 1 at the end of a row/round does not count as a stitch
Repeat stitch pattern between * - * until the end of the round/row
Total count of stitches per round/row will appear in ( - ) at the end
Gauge is not important for this project. With suggested materials, your cat butt will measure approximately 4 inches across the center.
Skill Level: Easy
Terms Used (US Crochet Terminology)
- SC: Single Crochet
- MR: Magic Ring
- HDC: Half Double Crochet
- DC: Double Crochet
- Sl St: Slip Stitch
- CH: Chain
- INC: Increase (two stitches in the same space)
- Sk St: Skip Stitch
- F/O: Fasten off
Pattern:
F/O and hide ends

Attach secondary color (this is the color of your cat) secure with Ch 1

R2 2 HDC in each stitch, sl st to join, ch 1 (16)

R3 *1 HDC in next st, Inc* sl st to join, ch 1 (24)
R4 *1 HDC in next 2 sts, Inc* sl st to join, ch 1 (32)
R5 *1 HDC in next 3 sts, Inc* sl st to join (40)
Place a stitch marker in the last sl st.
F/O and weave in end.

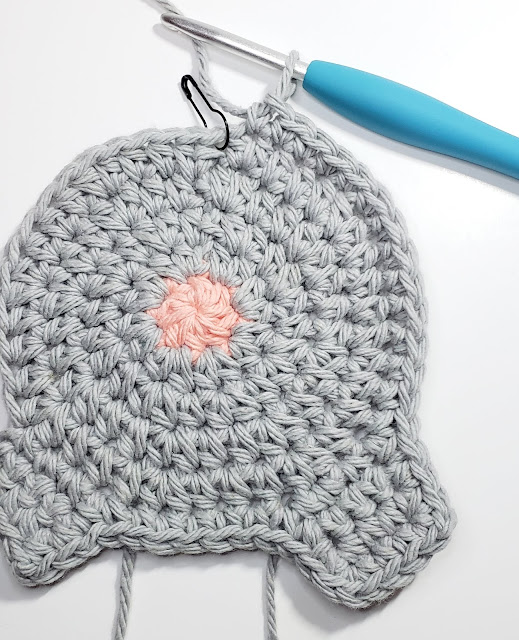
This next part may get a bit "wordy" as we have to place 5 more stitch markers to block off the legs/feet for your cat. Follow along with the steps below and reference the photo if you get confused.
Starting with first stitch marker, count 20 stitches in either direction and mark this stitch (this is the center point that we will base the legs off of).
From the second stitch marker, count over two (2) stitches in BOTH directions and mark each of these stitches (you should now have a total of 4 stitch markers)
From the 3rd and 4th stitch marker, count over another two (2) and place and your last two stitch markers (this blocks off the legs)

Legs/Feet:
Right Leg:
Right Leg:
R1 Starting with the right foot, attach your cat color yarn and SC 4 across the body (you should end at the other stitch marker for your leg)

R2 1 SC in each st, ch 1 turn (4)
R3 1 SC in each st (4)
F/O hide tail
Left Leg:
R1 With the right side of the work facing you, attach a new piece of yarn, SC 4 across the body to the other stitch marker. ch 1 and turn (4)
If the right side is facing you, you should be starting with the stitch marker furthest from the right foot and ending two stitch over from the second stitch marker that was placed.

Continue as with right foot (do not fasten off after the end of R3)
Border and Tail:
CH 1, instead of turning, we are going to work right into the last SC of R3
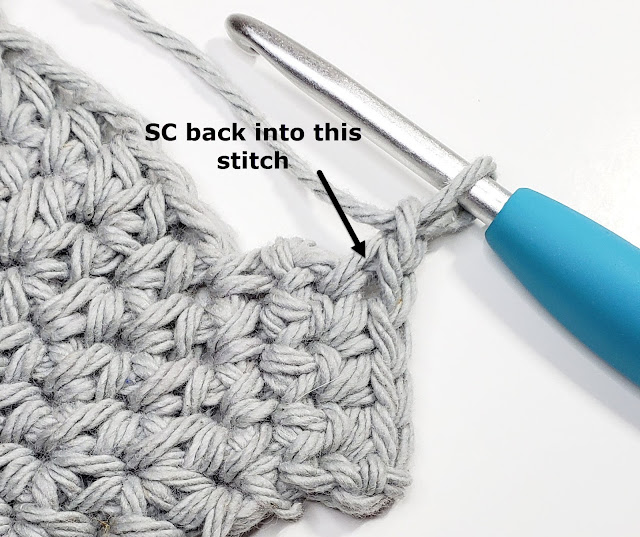
Start working SC stitches down the left leg leg and towards the right leg. Continue working SC's around the right leg and up towards the first stitch marker placed. Stop at the last SC before this stitch marker.
Tail:
Ch 12
Being careful not to twist your chain
DC in 2nd stitch from hook and next two stitches.
3 DC in next stitch (you should have 6 DC at this point)
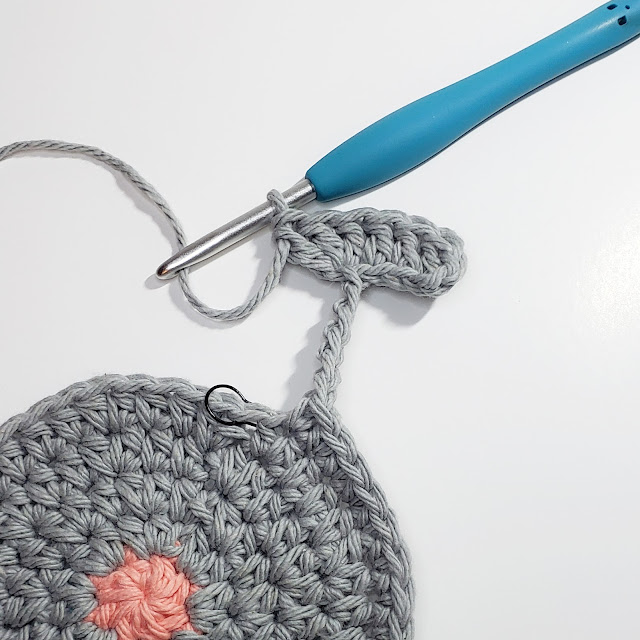
1 DC in the remaining 6 chains.
Attach to the body with a SC, skipping over the st with the stitch marker.

Continue to SC along the body until you arrive at the point where we started the SC border
F/O hide ends

R2 1 SC in each st, ch 1 turn (4)
R3 1 SC in each st (4)
F/O hide tail
Left Leg:
R1 With the right side of the work facing you, attach a new piece of yarn, SC 4 across the body to the other stitch marker. ch 1 and turn (4)
If the right side is facing you, you should be starting with the stitch marker furthest from the right foot and ending two stitch over from the second stitch marker that was placed.

Continue as with right foot (do not fasten off after the end of R3)
Border and Tail:
CH 1, instead of turning, we are going to work right into the last SC of R3

Start working SC stitches down the left leg leg and towards the right leg. Continue working SC's around the right leg and up towards the first stitch marker placed. Stop at the last SC before this stitch marker.

Tail:
Ch 12
Being careful not to twist your chain
DC in 2nd stitch from hook and next two stitches.
3 DC in next stitch (you should have 6 DC at this point)

1 DC in the remaining 6 chains.
Attach to the body with a SC, skipping over the st with the stitch marker.

Continue to SC along the body until you arrive at the point where we started the SC border
F/O hide ends
Please do not copy/alter this pattern and redistribute as your own. If you create a piece of your own, I'd love to see a photo! You can find me via the social media links below.
Pattern by Meriah Martin @ Not Your Yiyas Crochet
Follow me on Facebook
Follow me on Instagram
Comments
Post a Comment